
Tile Builder
Introduction
Tile Builder is a tool to edit many Tile Files (.tile.txt) at once and export them to image files (.png). The Tile Files were created with a program I'm developing right now. Although that program isn't available yet, I made the export routine available as Tile Builder so customers who bought my Isle of Lore 2: Hex Tiles asset pack can re-export the included Tile Files or edit them with scripts.

Tile Builder generating a tile image file from its elements (ground, border, trees, bushes etc.) as well as its Tile File (which stores the tile data, like the positioning of the elements), with the help of a Script File (which performs the export among other things).
Please keep the license in mind, which is available as a License.txt-file in the folder you downloaded. If you have questions or feedback, you can reach me through the following channels. I especially recommend the mailing list and my Discord server to stay up-to-date respectively to chat about your and my projects!
- E-Mail: info@stevencolling.com
- Mailing List (get news and exclusive discounts!): https://mailinglist.stevencolling.com/game_assets/
- Discord Server (connect with others using my software and assets!): https://stevencolling.com/discord.php
- Discord Profile: https://discordapp.com/users/171308170038214656/
- General Help: https://stevencolling.com/help.htm
- Website: https://stevencolling.com
Configuration
Tile Builder expects a so-called User Data Folder, in which all the relevant data like elements (trees, bushes etc.), Tile Files (.tile.txt) and scripts are stored. The folder structure looks like this:
- Content
- Borders
- Isle of Lore 2
- (folders containing borders)
- Elements
- Isle of Lore 2
- (folders containing elements)
- Grounds
- Isle of Lore 2
- (folders containing grounds)
- Scripts
- Tiles
- Isle of Lore 2
- (folders containing tiles as Tile Files and image files)
- Workbench
The top-level folders contain the following types of files:
- Borders: tile borders
- Elements: things like trees, bushes and grass marks
- Grounds: tile backgrounds
- Scripts: scripts for Tile Builder
- Tiles: both Tile Files (*.tile.txt) and their image file exports (*.png)
- Workbench: a folder on which Tile Builder works to avoid risking overwriting your content files
!
This folder structure is not specific to my asset packs, so if you have content like tile sets or elements from other creators, you can create a folder next to the Isle of Lore 2 folders and access them through Tile Files and scripts like any other content.
Now let's set up Tile Builder:
- Tile Builder comes with a Configuration File config.txt as well as an example Script File iol2_export.script.txt.
- Open the Configuration File config.txt and change the User Data Folder property to the location of your User Data Folder named Content. The Configuration File should now look similar to this:
- Copy the Script File iol2_export.script.txt to the Scripts-folder within your User Data Folder at Content\Scripts, if not already there.
- If you are starting Tile Builder now, it should output messages into a console about performing script iol2_export.script.txt and finishing off with a ...done!. If so, you've set up Tile Builder correctly! The following sections will explain how to use it.
User Data Folder: path\to\the\user\data\folder\Content
Run Scripts: iol2_export.script.txt
Workbench
The Workbench is where Tile Builder performs the scripts. This means, that if you want to change or re-export tiles from the various tile folders within Tiles\Isle of Lore 2, you have to copy the Tile Files (*.tile.txt) to the Workbench folder first, execute Tile Builder and copy the edited and/or exported tiles back to their original folders. A common workflow would look like this:
- Copy Tile Files (*.tile.txt) to the Workbench-folder.
- Set the Script in Tile Builder's config.txt by changing the Run Scripts property. The following example Configuration File references the iol2_export.script.txt. Tip: You can perform multiple scripts by adding them comma-separated to the config.txt.
- If you want, you can make changes to the Script File referenced in the Configuration File. The next section Scripting will explain this further.
- Execute TileBuilder.exe. Tile Builder will perform the referenced Scripts on all the Tile Files in the Workbench-folder.
- Check the results.
- Copy the changed and exported tiles back from the Workbench-folder to their respective tile folders, where you copied them from beforehand.
User Data Folder: path\to\the\user\data\folder\Content
Run Scripts: iol2_export.script.txt
Tile Files
Tile Files (*.tile.txt) store a tile's information required to assemble the tile's image file (*.png). The following shows the content of a Tile File from my asset pack Isle of Lore 2: Hex Tiles.
# CANVAS
version: 1.0
size: (840, 840)
element_offset: (0, 0)
# GROUND
id: "Isle of Lore 2\flat.grass_grounds.green\grass_ground_0"
position: (57, 103)
render: true
# BORDER
id: "Isle of Lore 2\flat.border_medium.dark\border_medium_0"
position: (22, 66)
# RENDER MASK
active: true
# ELEMENTS
element: id:"Isle of Lore 2\grass_patches.green\grass_patch_40" layer:ground position:(563, 439) flipped:false sort:0
element: id:"Isle of Lore 2\grass_patches.green\grass_patch_43" layer:ground position:(201, 544) flipped:true sort:1
element: id:"Isle of Lore 2\grass_patches.green\grass_patch_8" layer:ground position:(557, 539) flipped:true sort:2
element: id:"Isle of Lore 2\grass_marks.green\grass_marks_44" layer:ground position:(477, 555) flipped:false sort:3
element: id:"Isle of Lore 2\grass_bushes.green\grass_bush_30" layer:main position:(502, 327) flipped:true
element: id:"Isle of Lore 2\pine_trees.green\pine_tree_0" layer:main position:(430, 336) flipped:true
element: id:"Isle of Lore 2\pine_trees.green\pine_tree_26" layer:main position:(549, 345) flipped:true
element: id:"Isle of Lore 2\pine_trees.green\pine_tree_35" layer:main position:(300, 347) flipped:true
element: id:"Isle of Lore 2\pine_trees.green\pine_tree_36" layer:main position:(610, 396) flipped:true
element: id:"Isle of Lore 2\grass_bushes.green\grass_bush_14" layer:main position:(299, 402) flipped:false
element: id:"Isle of Lore 2\pine_trees.green\pine_tree_1" layer:main position:(220, 415) flipped:true
element: id:"Isle of Lore 2\pine_trees.green\pine_tree_57" layer:main position:(368, 431) flipped:false
element: id:"Isle of Lore 2\grass_bushes.greendark\grass_bush_21" layer:main position:(415, 432) flipped:true
element: id:"Isle of Lore 2\grass_bushes.greendark\grass_bush_54" layer:main position:(237, 438) flipped:true
element: id:"Isle of Lore 2\bushes.green\bush_16" layer:main position:(391, 501) flipped:true
element: id:"Isle of Lore 2\pine_trees.green\pine_tree_6" layer:main position:(158, 512) flipped:false
element: id:"Isle of Lore 2\pine_trees.green\pine_tree_52" layer:main position:(655, 519) flipped:false
element: id:"Isle of Lore 2\pine_trees.green\pine_tree_50" layer:main position:(732, 611) flipped:true
element: id:"Isle of Lore 2\pine_trees.green\pine_tree_21" layer:main position:(128, 612) flipped:false
element: id:"Isle of Lore 2\grass_bushes.greendark\grass_bush_53" layer:main position:(375, 629) flipped:true
element: id:"Isle of Lore 2\grass_bushes.greendark\grass_bush_56" layer:main position:(508, 644) flipped:true
element: id:"Isle of Lore 2\grass_bushes.green\grass_bush_7" layer:main position:(377, 683) flipped:false
element: id:"Isle of Lore 2\grass_bushes.greendark\grass_bush_47" layer:main position:(503, 713) flipped:false
element: id:"Isle of Lore 2\pine_trees.green\pine_tree_30" layer:main position:(651, 749) flipped:true
element: id:"Isle of Lore 2\pine_trees.green\pine_tree_59" layer:main position:(191, 773) flipped:false
element: id:"Isle of Lore 2\pine_trees.green\pine_tree_0" layer:main position:(563, 845) flipped:false
element: id:"Isle of Lore 2\pine_trees.green\pine_tree_46" layer:main position:(304, 851) flipped:false
element: id:"Isle of Lore 2\pine_trees.green\pine_tree_54" layer:main position:(429, 853) flipped:false
The Tile File specifies the canvas, the ground, the border, the render mask and the elements in their own respective section # CANVAS etc.
Tile File references a ground, border or element through identifiers (ids), which are the ground's, border's or element's Pack, Group and Name separated by a \ and encased in quotation marks ". The identifier is then used to resolve the actual location of the corresponding file. As an example, the following identifier...
Isle of Lore 2\pine_trees.green\pine_tree_30
...has the Group Isle of Lore 2, Pack pine_trees.green and Name pine_tree_30 and will reference the element at:
...\Content\Elements\Isle of Lore 2\pine_trees.green\pine_tree_30.png
The following sections go into further detail, what data the entries in the file represent.
Canvas
- version: version to identify with which version the Tile File was generated with. This can be ignored for now.
- size: the size of the canvas in pixels, in the format (width, height). These are the bounds for the final tile image.
- element_offset: optional entry which will offset all elements rendered on the tile by this value.
Ground
- id: the tile ground's identifier.
- position: the ground's position on the canvas in pixels, relative to the canvas' top-left origin and in the format (x, y) with the x-axis facing right and the y-axis facing downward.
- render: if the ground is rendered or not. If the render mask is set to active but this option is set to false, Tile Builder will use the ground to cut off elements reaching outside of the ground, but won't render the ground itself, leaving it transparent. This effect can be used to create overlay tiles.
Border
- id: the tile border's identifier.
- position: the border's position on the canvas in pixels, relative to the canvas' top-left origin and in the format (x, y) with the x-axis facing right and the y-axis facing downward.
Render Mask
- active: if the render mask is active or inactive. If it is active, elements outside the ground will be cut off. If it is inactive, elements can reach outside of the ground. The following figure will illustrate the difference.
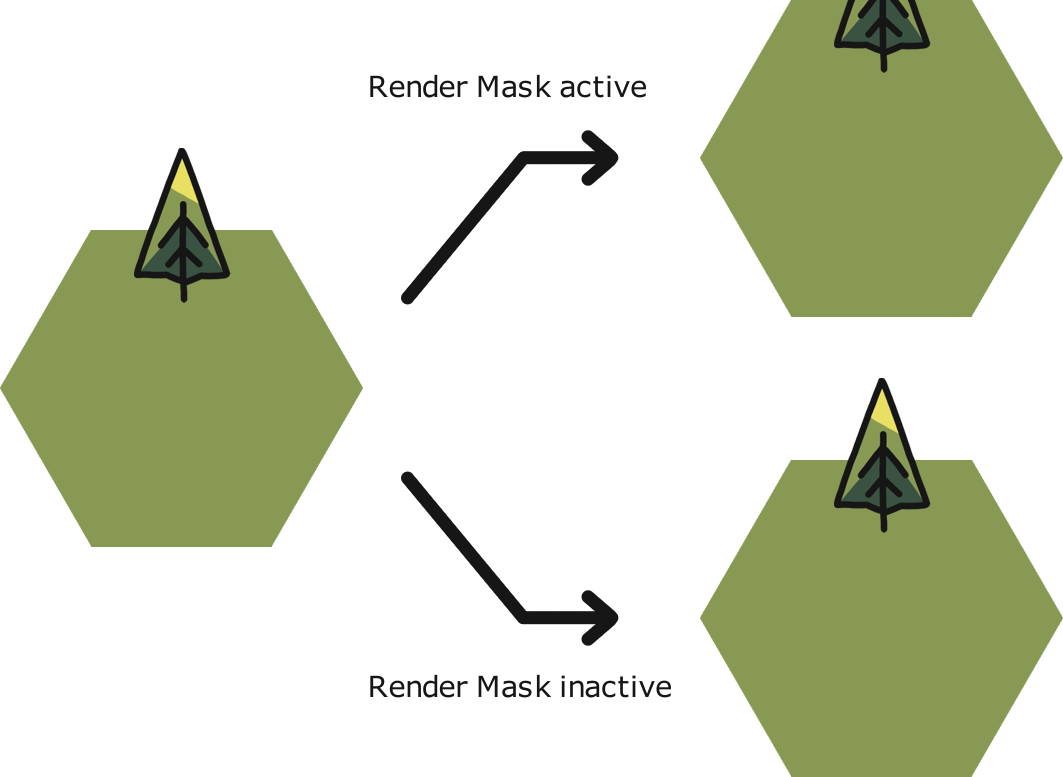
Depending on if the render mask is active or not, elements reaching outside of the ground will be cut off or not.
Elements
Each element has its own entry, starting with the element: keyword and then listing the element's properties on the same line. These properties include:
- id: the element's identifier.
- layer: the element's layer, which can either be ground, main or air. When rendering the tile's image file, first all ground elements are rendered in the order of their sort index. Secondly, all main elements are rendered ordered by their y-position, so that elements in front of other elements are rendered above them. Finally, all air elements are rendered, ordered by their y-position, too.
- position: the element's position on the canvas in pixels, relative to the canvas' top-left origin and in the format (x, y) with the x-axis facing right and the y-axis facing downward.
- flipped: if the element is flipped (true) or not (false). Flipping means, that the image is rendered horizontally mirrored to increase the visual variety of the available elements.
- sort: the element's sort index, if it is an element with layer set to ground. The higher the sort index, the further to the front will the ground element appear.
As an example, the following line will render pine tree 0 horizontally flipped on the main layer at canvas position 430/336.
element: id:"Isle of Lore 2\pine_trees.green\pine_tree_0" layer:main position:(430, 336) flipped:true
Scripting
Tile Builder uses Script Files to perform on Tile Files, which includes changing them, but also to export them to an image file. This section will go through the available script commands, which all have to be put on their own line and are performed one by one, from top to bottom. Lines within the Script File starting with // are ignored though. Don't forget to call save_tile to save the changes to the Tile File!
Scripts with commands acting on tiles always have to set their type to tile script in the first line of the script file with set_type = tile script. All commands shown below can be called in tile script-scripts, except the command Gather, which is an operational command and has to be placed in scripts with their type set to operational script. That's because operational commands aren't executed for each tile, but once.
!
The names of Script Files have to end on .script.txt. Otherwise Tile Builder won't recognize and perform these scripts!
Set Type
Sets the type of the script. Only scripts of the type tile script or operational script will be loaded by Tile Builder. If no type is set, the script is ignored instead.
Command:
set_type = type
Example:
set_type = tile script
Save Tile
Saves the Tile File on which the script performed. Use this in a script file after you made some changes to the Tile File with other commands to actually save the changes to the .tile.txt-file.
Command:
save_tile
Example:
save_tile
Build Tile
Generate an image file from the Tile File. The image file will be stored within the workbench at the location of the Tile File.
Command:
build_tile
Example:
build_tile
Set Version
Sets the tile file's version.
Command:
set_version = version
Example:
set_version = 1.0
Set Canvas Size
Sets the canvas size.
Command:
set_canvas_size = (width, height)
Example:
set_canvas_size = (840, 840)
Set Element Offset
Sets the element offset. The position of all elements will be changed by this offset when they are rendered on the canvas.
Command:
set_element_offset = (x, y)
Example:
set_element_offset = (-57, -106)
Set Ground Identifier
Sets the ground identifier. The Pack, Group and Name parts of the identifier can be accessed separately. Check the examples for reference. Ground identifiers can be changed via mappings, too.
Command:
set_ground_identifier = identifier
Example:
// Set the whole identifier:
set_ground_identifier = "Isle of Lore 2\pointy.grass_grounds.green\grass_ground_0"
// Set only the Pack of the identifier:
set_ground_identifier = pack:"Isle of Lore 2"
// Set only the Group of the identifier:
set_ground_identifier = group:"pointy.grass_grounds.green"
// Set only the Name of the identifier:
set_ground_identifier = name:"grass_ground_0"
// Set the Group of the identifier if the ground is from another specific Group:
set_border_identifier = group:"flat.grass_grounds.green"->group:"flat.grass_grounds.winter"
Set Ground Position
Sets the ground's position relative to the canvas' top-left origin.
Command:
set_ground_position = (x, y)
Example:
set_ground_position = (108, 56)
Set Ground Render
Sets if the ground is actually rendered or not.
Command:
set_ground_render = true/false
Example:
set_ground_render = true
Set Border Identifier
Sets the border identifier. The Pack, Group and Name parts of the identifier can be accessed separately. Check the examples for reference. Border identifiers can be changed via mappings.
!
Changing the border may require changing the border position, too! If you change the borders of my Isle of Lore 2: Hex Tiles pack, please refer to its documentation (section "Specification") in regard to the proper border positioning.
Command:
set_border_identifier = identifier
Example:
// Set the whole identifier:
set_border_identifier = "Isle of Lore 2\pointy.border_medium.dark\border_medium_0"
// Set only the Pack of the identifier:
set_border_identifier = pack:"Isle of Lore 2"
// Set only the Group of the identifier:
set_border_identifier = group:"pointy.border_medium.dark"
// Set only the Name of the identifier:
set_border_identifier = name:"border_medium_0"
// Set the Name of the identifier if the border is from a specific Group:
set_border_identifier = group:"flat.border_medium.dark"->name:"border_medium_0"
Set Border Position
Sets the border's position relative to the canvas' top-left origin.
Command:
set_border_position = (x, y)
Example:
set_border_position = (76, 24)
Set Render Mask
Sets the render mask as active or not.
Command:
set_render_mask = true/false
Example:
set_render_mask = true
Set Elements Identifier
Sets the identifier of all elements. The Pack, Group and Name parts of the identifier can be accessed separately. By using a mapping (->), only specific elements are affected by the change. Both sides of the mapping can be specified independently of each other (for example changing the Group of elements with a certain Name). Check the examples for reference.
Command:
set_elements_identifier = identifier
Example:
// Set the whole identifier for all elements:
set_elements_identifier = "Isle of Lore 2\pine_trees.green\pine_tree_6"
// Set only the Pack of the identifier of all elements:
set_elements_identifier = pack:"Isle of Lore 2"
// Set only the Group of the identifier of all elements:
set_elements_identifier = group:"pine_trees.green"
// Set only the Name of the identifier of all elements:
set_elements_identifier = name:"pine_tree_6"
// Set the whole identifier for specific elements:
set_elements_identifier = "Isle of Lore 2\pine_trees.green\pine_tree_6"->"Isle of Lore 2\pine_trees.green\pine_tree_8"
// Set only the Pack of the identifier of specific elements:
set_elements_identifier = "Isle of Lore 2\pine_trees.green\pine_tree_6"->pack:"Isle of Lore 2"
// Set only the Group of the identifier of specific elements:
set_elements_identifier = "Isle of Lore 2\pine_trees.green\pine_tree_6"->group:"pine_trees.winter"
// Set only the Name of the identifier of specific elements:
set_elements_identifier = "Isle of Lore 2\pine_trees.green\pine_tree_6"->name:"pine_tree_8"
// Set only the Group of the identifier of elements of a certain group:
set_elements_identifier = group:"pine_trees.green"->group:"pine_trees.winter"
Resample Elements
Resamples all the elements from their group.
Command:
resample_elements
resample_elements = group-identifier
Example:
// Resample everything:
resample_elements
// Resample all oak trees:
resample_elements = "Isle of Lore 2\oak_trees.green"
Remove Elements
Removes all the elements with a certain identifier from the Tile File. The Pack, Group and Name parts of the identifier can be accessed separately. Check the examples for reference.
Command:
remove_elements
remove_elements = identifier
Example:
// Removes all elements:
remove_elements
// Removes only specific elements:
remove_elements = "Isle of Lore 2\pine_trees.green\pine_tree_6"
// Remove all elements from a certain Pack:
remove_elements = pack:"Isle of Lore 2"
// Remove all elements from a certain Group:
remove_elements = group:"pine_trees.green"
// Remove all elements with a certain Name:
remove_elements = name:"pine_tree_6"
Gather
Copies a folder from the Tiles User Data Folder to the Workbench. This is an operational command and has to be placed in operational scripts, not tile scripts.
Command:
gather = from to
Example:
// Copies the folder at "Content\Tiles\Isle of Lore 2\flat.city_clearing.green" to "Content\Workbench\flat.city_clearing.winter" while also renaming it
gather = "Isle of Lore 2\flat.city_clearing.green" "flat.city_clearing.winter"
Execute Script
Executes the specified script. This command can be placed in both tile scripts and operational scripts.
Command:
execute_script = script
Example:
// Executes the iol2_winter.script.txt on all the tiles in the Workbench folder
execute_script = iol2_winter.script.txt
Troubleshooting
Error: The required configuration file at '...' was not found!
Make sure that the Tile Builder Configuration File config.txt and the TileBuilder.exe are within the same folder.
Error: Could not find user data folder at '...'!
Open the config.txt and make sure that the directory specified as User Data Folder actually exists and the statement is written correctly as follows:
User Data Folder: path\to\the\user\data\folder\Content
Tile Builder doesn't find my script!
Make sure that the script file ends on .script.txt and is properly referenced in the config.txt. Do not reference the script by path, but by name only: Tile Builder will add .script.txt by itself and look for the file in the Scripts folder.
Tile Builder finds or performs my script but nothing happens!
Every script needs to start with a line setting the script's type: set_type = tile script or set_type = operational script. Please check the example iol2_export.script.txt which came with Tile Builder as reference!
Error: Can't perform invalid command '...' in script '...'!
You seem to have a typo in your command. If the command has arguments, make sure that you use the format command = arguments.
Error: Can't perform command '...' in an operational/tile script!
Commands acting on tiles like build_tile have to be placed in a tile script, and commands not acting on tiles like gather have to be placed in an operational script. Make sure that the script's type is set properly in the first line with set_type = tile script respectively set_type = operational script.
Error: Invalid canvas size of ... in tile '...'!
A canvas needs to have a width and height greater than zero.
Error: Could not find '...' in tile '...'!
Tile Builder tried to access a non-existent file. Please make sure that the identifiers in the given Tile File are written correctly and lead to existent files. Please refer to the Tile Files section and make sure that the identifier is in the format group\pack\name without any .png-extension!
Error: Could not find directory '...' relative to 'Content\Tiles'!
The Gather-command expects a path relative to the Tiles folder inside the User Data Folder.
Error: Could not find a script file at '...'!
The Execute Script-command expects a script name for a script file from the Scripts folder.
I have a problem I can't solve or I solved it and it should be mentioned here!
Please write me about it.
Changelog
1.4 19. Mar 2026 Changed the name of the user data folder from 'HexMapMaker' to 'Content' and updated the project to .NET 10.
1.3 23. Oct 2024 Fixed rendering a transparent ground while the render mask is active.
1.2 26. Feb 2024 Added set_element_offset, so the position of all elements can be offset when rendered on the canvas.
1.1 24. Aug 2023 Fixes in rendering regarding anti-aliasing and masking.
1.0 21. Jun 2023 Release.