Introduction
Hexxmap is a hex tile map editor. Development took me quite some time, almost two years and hundreds of hours. It's a labor of love and my contribution to the tabletop rpg community. My goal and intention was to create a hex map editor which is satisfying to use. In the future, I will add more features and fix issues and bugs which might occur.
If you have any questions, problems, feedback or want to discuss Hexxmap with other users, please join my Discord Server. If you want to reach out personally, you can both write me a mail or send me a message on Discord. If you want to keep in touch with my work, check out my Website or join my Mailing List, where I sometimes give out exclusive discounts.
For more information regarding Licenses & Terms, please refer to the respective section.
Overview
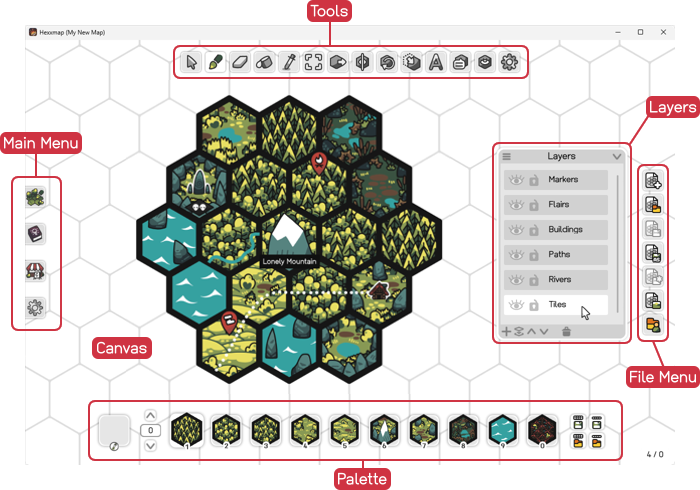
Most of the screen is covered by the Canvas, where you will place your tiles. At the top you'll find the Toolbox to paint, erase and manipulate tiles on the canvas. Use the Palette at the bottom to select the tiles to paint. If you move the cursor near the left window side, the Main Menu pops up, giving you access to the program settings. On the right side you have the File Menu for loading and saving maps. The Layers dialog can be placed anywhere on the screen and even be collapsed so it's out of the way.
User Content
➜ User Data Location
Hexxmap stores its user data, including tiles, maps and settings, in a special user data folder it creates when starting the program the first time. Click the ![]() Open User Data Button in the File Menu or hit F7 to open the folder. It usually refers to C:\Users\YourUsername\AppData\Local\Hexxmap. In there, you'll find:
Open User Data Button in the File Menu or hit F7 to open the folder. It usually refers to C:\Users\YourUsername\AppData\Local\Hexxmap. In there, you'll find:
- Backups: copies of map files you can move back to the maps folder to restore them
- Content: content files, including tile images
- Exports: exports of your maps
- Logs: log files you can send me in case the program crashes
- Maps: map files
- Palettes: exported palettes and palette lines
- Settings: the settings file to configure the program manually
➜ Move User Data
You can change where Hexxmap tries to find its content files, including your tile images, by changing the Hexxmap Folder Location on the Settings Screen (at the very top). After changing the folder to a new target location, please manually move all your content folders, except the Settings-folder, to the new location and restart Hexxmap. The Settings-folder and its settings file always stay at the original location.
➜ Content Identifiers
When painting tiles on the canvas or saving a map, Hexxmap internally handles your tiles as a so-called identifier, which is the relative path to the tile image file without the file extension. Let's have a look at an example file from the Isle of Lore 2 tile pack:
"C:\Users\YourUsername\AppData\Local\Hexxmap\Content\Isle of Lore 2\pointy\pointy.pine_forest_dense.green\pine_forest_dense_0.png"
When placed on the map, it will refer to this file with the identifier Isle of Lore 2\pointy\pointy.pine_forest_dense.green\pine_forest_dense_0.
Should you change the folder structure or file names within the Content-folder, the identifiers won't be displayed correctly anymore (an error texture is shown instead). The identifiers still stay intact though, so restoring the folder structure or file names will display the identifiers correctly again. Although I would not recommend to change the structure of your Content-folder, you could open your map files in a text editor and search-and-replace the identifiers to correct them, in case you have to.
Identifiers make it possible to load and edit a map on a different computer, as long as the structure within the Content-folder is the same.
➜ Add Content
Navigate to the Content-folder inside your User Data Directory. Here you can put any tile packs so they appear and are usable in Hexxmap as Content Identifiers. It is recommended that every folder within Content is named after the tile pack. If you create a new map with one of my tile packs, make sure to set the proper Grid Properties.
➜ Reload Content
If you make changes to the textures while Hexxmap is already open, you have to either restart the program or press F6. This will certainly produce a lag, as Hexxmap reloads all of its textures, but afterwards, the changes you made should appear right away.
➜ Custom Localization
Navigate to the install folder of Hexxmap (not the user data folder!) and navigate to Content/Localization. There you'll find the localization files for every supported language. If you want to create your own localization, copy the english.csv, rename it to the language you want to create and open the file with a text editor. Change the topmost line from # English, English to your language, for example # German, Deutsch. The language will be available on the Settings Screen in Hexxmap.
Map Properties
The Map Properties Dialog is accessed through the ![]() Map Properties Button in the Toolbox or by pressing I. Within, the overall properties of the map can be changed, with the map adapting immediately with the changes you make. Map properties are saved inside the map file. You can set the default map properties for new maps in the Settings. My tile packs have the proper map property settings written in their respective documentation.
Map Properties Button in the Toolbox or by pressing I. Within, the overall properties of the map can be changed, with the map adapting immediately with the changes you make. Map properties are saved inside the map file. You can set the default map properties for new maps in the Settings. My tile packs have the proper map property settings written in their respective documentation.
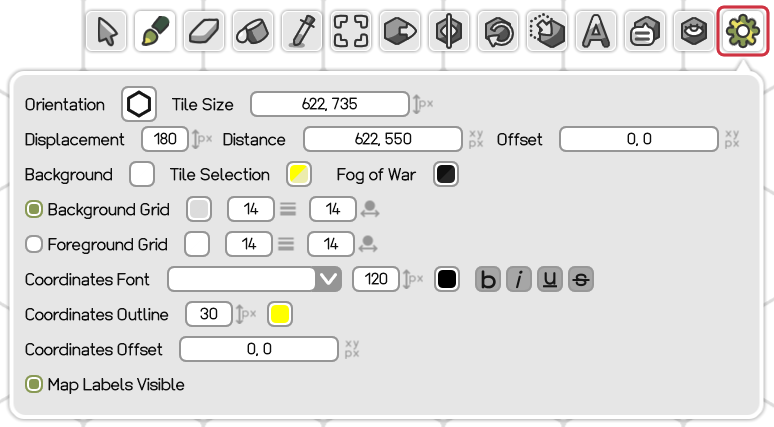
Check the Grid Properties section for the proper map properties when using my tile packs.
The map properties are:
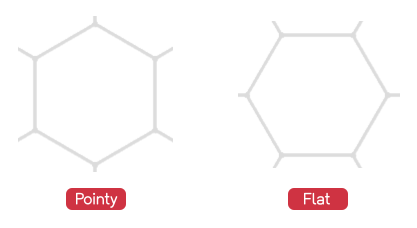
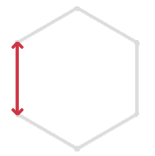
- Orientation: tile orientation (pointy or flat).
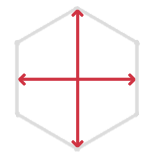
- Tile Size: width and height of a tile, or the distance within a tile's borders.
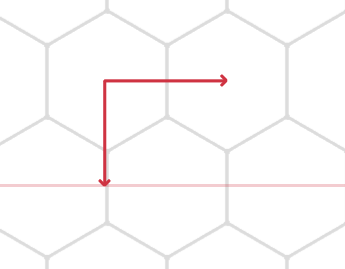
- Displacement: the length of a tile's vertical border (for the pointy orientation) or horizontal border (for the flat orientation).
- Distance: horizontal and vertical distance between tile columns and tile rows.
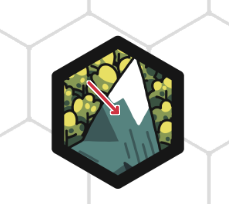
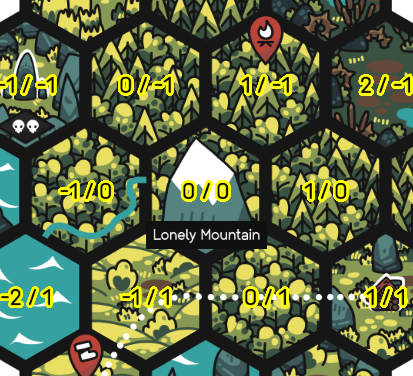
- Offset: offset of a tile relative to its grid cell center. This can be used to fix the tile alignment relative to the grid for isometric tiles, or tiles which have a certain amount of buffer, for example mountains exceeding the tile at the top.
- Background: background color of the map.
- Tile Selection: color of the overlay when Selecting Tiles.
- Fog of War: color of the Fog of War overlay.
- Background Grid: grid color, line width and node width for the background grid. The checkbox at the very left determines if the grid is visible at all.
- Foreground Grid: a grid layed on top of tiles (but not on the background grid). The checkbox at the very left determines if the grid is visible at all.
- Coordinates Font: font family, size, color and style of the Tile Coordinate Overlay text.
- Coordinates Outline: width and color for the outline around the Tile Coordinate Overlay text.
- Coordinates Offset: offset of the Tile Coordinate Overlay relative to the grid.
- Map Labels Visible: if Map Labels are visible.
Clicking on a color button will open the Color Picker Dialog.
Canvas
➜ Camera Pan
Move the camera around by holding the right mouse button and moving the mouse. Alternatively, you can use the Arrow Keys. Please refer to the Input-section in the Settings to change how the camera moves, including its speed and sliding effect.
➜ Camera Zoom
The map can be zoomed with the mouse wheel or with the , and . keys. The zooming locks in at certain levels defined in the Settings (Camera Zoom Levels in the Input-section). The default zoom levels are "100%, 70%, 50%, 30%", which means, that when you zoom, it will move between these zoom levels.
Minor technical detail: you may experience a short lag when zooming out for the first time after loading a map, as the creation of the background grid texture is delayed until the grid is actually required at that zoom level.
For some tile packs, like Isle of Lore 2, the tile images have a huge image size (print quality). But for a computer screen, a zoom of 100% is way too big, and a zoom of 30% not zoomed out enough. For that reason, there is a so-called Camera Zoom Adaptation active by default, which adapts the zoom levels depending on the tile's size, so 100% feels zoomed in naturally independent of the actual tile size. A map export will ignore this zoom adaptation though, so the exported file will have the proper quality.
➜ Jump to Coordinate
The tile coordinate in the bottom right screen corner shows the tile coordinate of the tile your cursor is currently placed on top of. If you click on the tile coordinate display or press F2, you can jump to any tile coordinate on the map. The respective tile will be centered on the canvas then. Tip: you don't have to write the "/" when trying to navigate to "20 / 10"; just type "20 10" and hit Enter. You also don't have to type in both coordinates. Typing "0" and hitting Enter will navigate to "0 / 0".
➜ Coordinate Overlay
Hold N to display the tile coordinate overlay. Please be aware that showing the coordinates when zoomed out can impact the performance of the program as long as the coordinates are displayed. The overlay's appearance can be configured in the Map Properties dialog.
Toolbox
The Toolbox can be found at the top of the screen.
➜ Cursor Tool
Click on the ![]() Cursor Tool Button in the toolbox or press C to select the Cursor Tool.
Cursor Tool Button in the toolbox or press C to select the Cursor Tool.
The Cursor Tool is the default tool to avoid making any changes to the map by accident and does... absolutely nothing.
➜ Brush Tool
Click on the ![]() Brush Tool Button in the toolbox or press B to select the Brush Tool.
Brush Tool Button in the toolbox or press B to select the Brush Tool.
The Brush Tool is used to paint tiles on the currently selected Layer. Hold the left mouse button down and drag the cursor across the canvas to paint multiple tiles.
Clicking the tool button or pressing its key will hide respectively toggle the Brush Tool Dialog, a little window below the button.
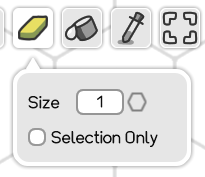
With it, you can further tweak the behavior of the Brush Tool:
- Size: painting radius, in tiles. A size of 1 will paint one tile at the cursor's location. A size of 2 will paint a tile there and one ring of tiles around it, and so on.
- Empty Only: if active, only parts of the map can be painted which have no tile, given the currently selected Layer.
- Selection Only: if active, only Selected Tiles can be painted.
- Sample Once: samples a tile from the currently selected Palette Slot once and then uses it while painting, as long as the left mouse button is pressed down.
There's also a cool hidden feature which is called Tile Identifier Rotation. If the Brush Tool is placed on a tile, hold Ctrl and use the mouse wheel. If the tile is part of the identifiers of the currently selected Palette Slot, the mouse wheel will make the tile rotate through all possible tiles (in ascending or descending order depending on if the mouse wheel is scrolled upwards or downwards). This is a great way to change a certain tile, for example a mountain tile, into a very specific tile from the set of mountains, but as said, the selected Palette Slot must contain that identifier somehow.
➜ Eraser Tool
Click on the ![]() Eraser Tool Button in the toolbox or press E to select the Eraser Tool. You can temporarily switch to the Eraser Tool while having another tool selected by holding Alt.
Eraser Tool Button in the toolbox or press E to select the Eraser Tool. You can temporarily switch to the Eraser Tool while having another tool selected by holding Alt.
The Eraser Tool is used to remove tiles on the currently selected Layer. Hold the left mouse button down and drag the cursor across the canvas to erase multiple tiles.
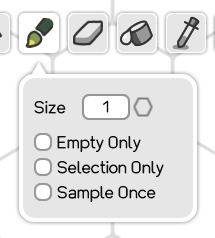
Clicking the tool button or pressing its key will hide respectively toggle the Eraser Tool Dialog, a little window below the button.
With it, you can further tweak the behavior of the Eraser Tool:
- Size: erasing radius, in tiles. A size of 1 will erase one tile at the cursor's location. A size of 2 will erase a tile there and one ring of tiles around it, and so on.
- Selection Only: if active, only Selected Tiles can be erased.
➜ Fill Tool
Click on the ![]() Fill Tool Button in the toolbox or press F to select the Fill Tool.
Fill Tool Button in the toolbox or press F to select the Fill Tool.
The Fill Tool is used to fill an area with tiles on the currently selected Layer. The difference to the Brush Tool is, that it can't be used while holding the left mouse button down, and a special "Selection All" property allowing to fill all of the selected tiles at once.
Clicking the tool button or pressing its key will hide respectively toggle the Fill Tool Dialog, a little window below the button.
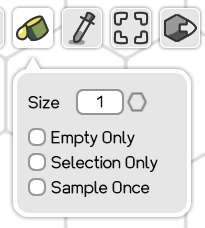
With it, you can further tweak the behavior of the Fill Tool:
- Size: fill radius, in tiles. A size of 1 will paint one tile at the cursor's location. A size of 2 will paint a tile there and one ring of tiles around it, and so on.
- Empty Only: if active, only parts of the map can be filled which have no tile, given the currently selected Layer.
- Selection Only/All: clicking on the checkbox switches through the states "off", "Selection Only" and "Selection All". If "Selection Only" is active, only Selected Tiles will be filled. If "Selection All" is active, all selected tiles will be filled, independent of the fill size.
- Sample Once: samples a tile from the currently selected Palette Slot once and then uses it to fill the area.
➜ Pick Tool
Click on the ![]() Pick Tool Button in the toolbox or press P to select the Pick Tool. You can temporarily switch to the Pick Tool while having another tool selected by holding Ctrl+Shift.
Pick Tool Button in the toolbox or press P to select the Pick Tool. You can temporarily switch to the Pick Tool while having another tool selected by holding Ctrl+Shift.
The Pick Tool is used to pick a specific tile on the map and put it into the Palette Picker Slot, where it can be used with other tools like the Brush Tool to quickly replicate tiles on the map.
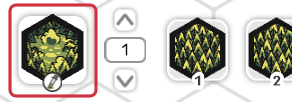
The currently picked tile is shown left to the Palette:

➜ Select Tool
Click on the ![]() Select Tool Button in the toolbox or press S to select the Select Tool. You can temporarily switch to the Select Tool while having another tool selected by holding Shift. By pressing Ctrl+A or Ctrl+Shift+A, you can select (or unselect) all tiles on the map. The appearance of the selection can be configured in the Map Properties.
Select Tool Button in the toolbox or press S to select the Select Tool. You can temporarily switch to the Select Tool while having another tool selected by holding Shift. By pressing Ctrl+A or Ctrl+Shift+A, you can select (or unselect) all tiles on the map. The appearance of the selection can be configured in the Map Properties.
The Select Tool is used to select tiles independently of the layer system, so you in fact select tile indices, not actual tiles. This selection can then be used by other tools like the Move Tool to move multiple tiles at once or the Fill Tool to only fill tiles in the selected area. By pressing Del, you can also quickly delete selected tiles, or cut, copy and paste them with Ctrl+X, Ctrl+C and Ctrl+V.
➜ Move Tool
Click on the ![]() Move Tool Button in the toolbox or press M to select the Move Tool.
Move Tool Button in the toolbox or press M to select the Move Tool.
The Move Tool is used to move a single tile around on the map by clicking on the tile and moving the cursor while holding the left mouse button down. The tile will snap to the grid at the target location and replace the tile there. By selecting tiles with the Select Tool, multiple tiles can be moved at once. You can also move tiles across multiple Layers, for example to move a tile and its overlay at once.
➜ Flip Tool
Click on the ![]() Flip Tool Button in the toolbox or press D to select the Flip Tool. Clicking the button or pressing the key again switches between a horizontal and a vertical flip.
Flip Tool Button in the toolbox or press D to select the Flip Tool. Clicking the button or pressing the key again switches between a horizontal and a vertical flip.
The Flip Tool is used to horizontally or vertically flip a clicked tile. Flipping a tile selected with the Select Tool will flip all tiles within the selection.
➜ Rotate Tool
Click on the ![]() Rotate Tool Button in the toolbox or press R to select the Rotate Tool. Clicking the button or pressing the key again switches between a clockwise and a counterclockwise rotation.
Rotate Tool Button in the toolbox or press R to select the Rotate Tool. Clicking the button or pressing the key again switches between a clockwise and a counterclockwise rotation.
The Rotate Tool is used to rotate a clicked tile. Rotating a tile selected with the Select Tool will rotate all tiles within the selection.
➜ Offset Tool
Click on the ![]() Offset Tool Button in the toolbox or press O to select the Offset Tool.
Offset Tool Button in the toolbox or press O to select the Offset Tool.
The Offset Tool is used to move the tile image relative to the tile it is hooked with. Please be aware that this doesn't alter the relation of the tile and its tile index (or hook) in any way, and it is strongly discouraged to move the tile far outside its original grid cell. The tool is intended to be used for positioning overlay tiles within a tile.

While moving the tile around, a red and a gray circle denote the relative offset of the cursor (red) and the hooked tile's origin (gray). If you move the tile image outside of the tile and want to move it back, click on the original grid cell, not the tile image itself!
Clicking the tool button or pressing its key will hide respectively toggle the Offset Tool Dialog, a little window below the button.
With that dialog, you can set the offset of the most recently clicked tile to a specific value, or reset it by typing in "0". You will have to click on the original grid cell, not the tile image itself.
➜ Map Label Tool
Click on the ![]() Map Label Tool Button in the toolbox or press L to select the Map Label Tool.
Map Label Tool Button in the toolbox or press L to select the Map Label Tool.
The Map Label Tool is used to create tile- and layer-independent text labels. Click somewhere on the map to create a new Map Label. A red cross ( ) will appear at the location and the Map Label Dialog will show up.
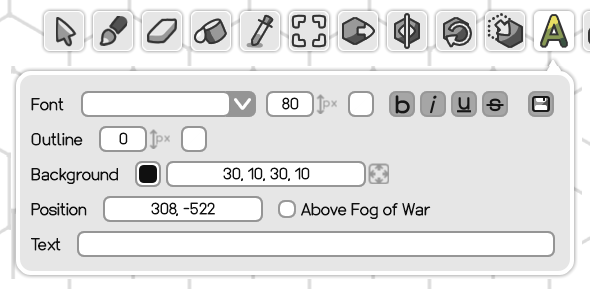
With the Map Label Dialog, the currently created (or selected) label's properties can be set:
- Font: font family, size, color and style. If it's empty, the standard font (Honey Pigeon) will be used. The size may appear huge, if Camera Zoom Adaptation is active, but that's normal.
- Outline: outline width and color.
- Background: a background box behind the label to make it stand out more easily. The box can be hidden by changing the background color's alpha (opacity) to 0%.
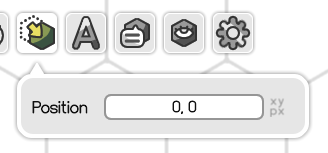
- Position: the position of the label on the map.
- Above Fog of War: if active, the map label will be rendered on top of the Fog of War.
- Text: the label's text.
Clicking on a color button will open the Color Picker Dialog.
Click the  Save Button within the Map Label Dialog to save the current label properties to this map, so that they are automatically applied to the Map Label Dialog when creating new labels. The button is grayed out when the current settings match the saved ones.
Map Labels can easily be moved by clicking and dragging them across the canvas with the left mouse button held down. Press Ctrl+A or Ctrl+Shift+A to select or unselect all map labels. To select labels only in a specific area, hold Shift and hold the left mouse button down while moving the cursor across the map: this will paint a selection box which will select any label touching it. Position and text can't be changed when there is more than one label selected. Finally, use the Del key to delete any selected labels and Ctrl+X, Ctrl+C or Ctrl+V to cut, copy or paste labels.
➜ Tile Story Tool
Click on the ![]() Tile Story Tool Button in the toolbox or press T to select the Tile Story Tool.
Tile Story Tool Button in the toolbox or press T to select the Tile Story Tool.
The Tile Story Tool is used to give tiles textual context. Clicking on a tile while the tool is selected will show the Tile Story Dialog where you can write public (player-facing) and private (hidden) information. A Tile Story Icon indicates which tiles have a story attached to them. The icon is colored for the currently inspected tile, and grayed out otherwise.
The information is bound to the tile index, and not to the tile image itself, and therefore layer-independent. Thanks to the Tile Story Tool's cut, copy and paste functionality, tile stories can be reset, moved and duplicated easily across the map: click on a Tile Story Icon and press Ctrl+X to cut it out, then click on another tile and press Ctrl+V to move the Tile Story there.
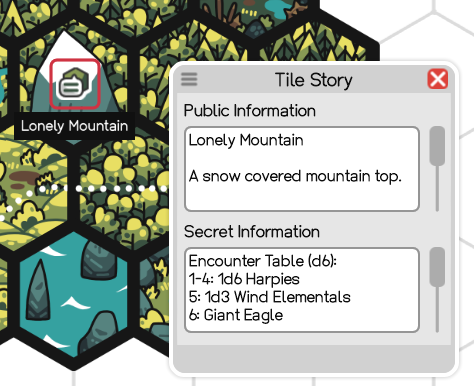
The dialog can be resized by clicking on the dialog's borders and moved with the  Move Button in the top left corner of the dialog. Right now, the tile stories are not exported and only visible within Hexxmap, but that might change in the future.
➜ Fog of War Tool
Click on the ![]() Fog of War Tool Button in the toolbox or press W to select the Fog of War Tool.
Fog of War Tool Button in the toolbox or press W to select the Fog of War Tool.
The Fog of War Tool is used to mark tiles as hidden or visible by clicking on them while the tool is selected. Hold the left mouse button and drag the cursor across the map to toggle the visibility state of multiple tiles. In Hexxmap, the hidden tiles have a semi-transparent overlay, which can be configured in the Map Properties, but they appear completely opaque when performing a Map Export.
Palette
The Palette can be found at the bottom of the screen.
➜ Palette Slots
The Palette consists of, from left to right, the Palette Picker, the Palette Lines Navigation, the Palette Slots and the Palette Menu.

Palette Slots work similar to action bars in video games, but the slots are filled with tiles to paint with. Clicking on a slot or pressing the keys 0 to 9 selects the respective slot and thus determines which tiles are used when painting with tools like the Brush Tool. Right-clicking on a slot will open the Configure Palette Button Dialog.
Swapping Palette Slots is done via drag&drop: click and hold a Palette Slot for a second, move it to another slot and release the left mouse button. Both slots will swap then. This is also possible across Palette Lines by pressing Ctrl+Tab or Ctrl+Shift+Tab to switch lines while dragging a slot.
➜ Palette Lines
The whole Palette is organized in so-called Palette Lines, each line containing 10 Palette Slots. To navigate through the lines, either press the  Up- or
  Down-Arrow in the Palette Line Navigation, press Ctrl+Tab or Ctrl+Shift+Tab or type in the line number into the input field between the navigation buttons and hit Enter. You can also quickly select the input field by pressing F1. There are 100 Palette Lines in total (from 0 to 99).
➜ Edit Palette
Palette Slots can be edited to determine which tiles are used when painting with the slot selected. To edit the slot, right-click on it or press Ctrl+(0-9). The Configure Palette Button Dialog will then show up:
The dialog can be resized by clicking on the dialog's borders and moved with the Move Button in the top left corner. There is also a menu at the bottom of the dialog, with which the slot can be configured by adding or removing Palette Entries.
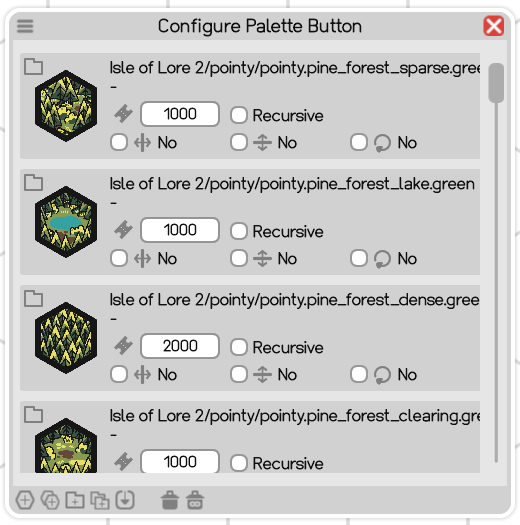
Each Palette Entry contributes tiles to the Palette Slot. Each entry represents either a single tile, a folder of tiles or a reference to another slot, each explained in detail further down below. Within the dialog, the Entry Type is represented by an icon in the top left corner. Below that there's a Tile Icon representing the entry. Next to it, the entry lists its Identifier, its Tokens and further Options.
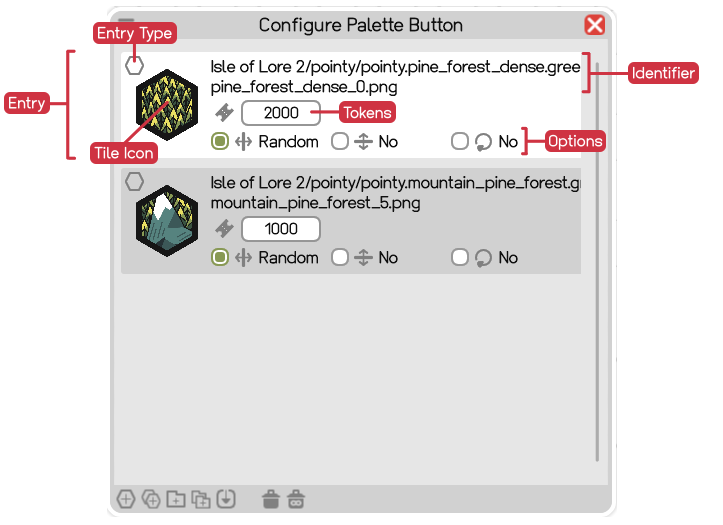
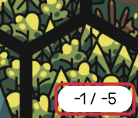
Entries are sampled based on their  Tokens. Think of those tokens as lottery tickets with which an entry is selected while painting with the respective slot. Take the example from the picture above. The forest has 2000 Tokens, the mountain 1000 Tokens. If this Palette Slot is used for painting, for example with the Brush Tool, it will produce twice as many forests as mountains.
Entries have serveral options to further determine how the tiles are sampled, including how they are  Flipped Horizontally,
  Flipped Vertically and
  Rotated. Through multiple clicks on the corresponding checkbox, the option can be activated or set to random, so that the tile is randomly flipped or rotated when sampled. As opposed to tile entries, folder entries have an additional Recursive option. When checked, the entry does not only sample from its folders, but also any child folders.
Fun fact: the icon shown in the palette is the entry icon of the most recently selected entry.
The Palette Menu at the bottom of the dialog provides buttons to create or delete entries.

Entries can be selected by clicking on them: they will have a white background to indicate the selection. Multiple entries can be selected by holding Shift while clicking on the entries. Selected entries can be deleted with the  Delete Button in the menu. To clear the whole slot of entries, use the
  Delete All Button instead.
Every entry type has its own button.
 Add Tile: select a specific tile to add as its own entry.
 Add Tiles: select multiple tiles and group them into one entry, all tiles sampled equally.
 Add Folder: select a folder to add as its own entry. All tiles within will be sampled equally.
 Add Folders: select multiple folders and group them into one entry. All tiles across all folders will be sampled equally.
 Add Palette Slot Reference: create a Palette Slot Reference entry. The entry will have options to determine a Line and a Slot. When this entry gets sampled, it will look up the given Palette Line and Palette Slot and sample the tile from there. This allows a chaining or sub-sampling of other slots, e.g. creating many different forest slots in a separate palette line and then creating a new slot which refers to each forest slot via Palette Slot Reference entries to create a "forest sampler" across all forest slots.
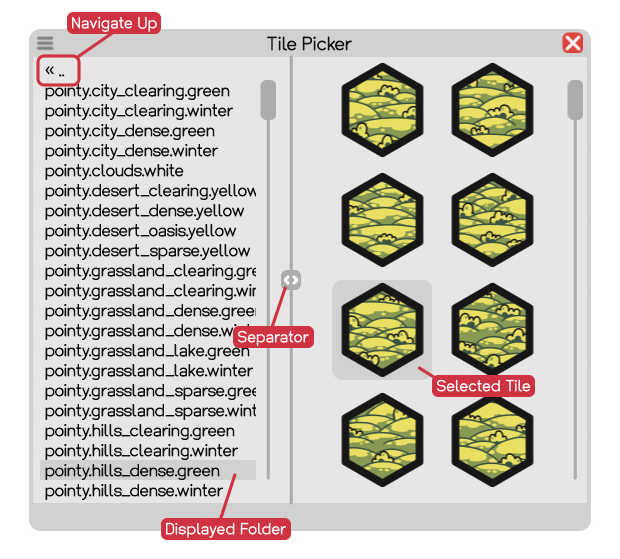
Creating a tile or folder entry will open the Selector Dialog to choose the tiles and folders. Double-clicking an entry will re-open the selector to adjust the selection.

The Selector Dialog is divided into a folder area, listing all sub folders of the current folder, and a tile area, listing all tiles in the currently displayed folder. A  separator button between these two areas can be used to change the size of the folder and tile area. Perform a double click on the "« .." at the very top of the folder area to navigate up and double click on a folder entry to navigate into that folder. A single click will mark the folder for display so its content is displayed in the tile area. Depending on which type of entry you are adding, the selector will display checkboxes next to folders and tiles to select them as part of the entry. If you are satisfied with your selection, click the big button at the bottom of the dialog. You can change your selection afterwards by performing a double click on the entry.
On a side note, pressing Ctrl+A and Ctrl+Shift+A will select respectively unselect all directories or tiles, if the cursor is placed in the tile or directory area of the dialog.
➜ Palette Picker
The Palette Picker Button is located left to the Palette. It will show the tile which was picked with the Pick Tool and can be selected like a Palette Slot to paint tiles with. This slot can be quickly selected by pressing Q.
Right-clicking on the Palette Picker Button or pressing Tab will open (or close) the Picker Dialog. This dialog is meant to quickly select specific tiles to paint with, omitting the process of setting up a Palette Slot with entries just to paint one specific tile. Using Tab to quickly toggle the dialog is strongly recommended.
The Picker Dialog can be resized by clicking on the dialog's borders and moved with theMove Button in the top left corner. The dialog is divided into a folder area, listing all sub folders of the current folder, and a tile area, listing all tiles in the currently displayed folder. A separator button between these two areas can be used to change the size of the folder and tile area. Perform a double click on the "« .." at the very top of the folder area to navigate up and double click on a folder entry to navigate into that folder. A single click will mark the folder for display so its content is displayed in the tile area.
Clicking on a tile once in the Picker Dialog will put the tile into the Picker Slot and select it, so it can be used for painting right away, while keeping the dialog open. Double clicking on a tile will do the same, but also close the dialog.
On a side note, right-clicking the Palette Picker Button will navigate the Picker Dialog to the currently picked tile, while pressing Tab restores the Picker Dialog like how it looked like when closed the last time.
➜ Palette Menu (Files)
Right next to the Palette, a little Palette Menu let's you export single palette lines or the whole palette (across all palette lines) into a file, which can be then imported at a later point in time or into other maps. The files have the extensions .palette.txt respectively .palette_line.txt and can be manually edited with a text editor.

Loading a palette line will overwrite the whole line, and loading a palette will overwrite the whole palette, so use it with care. Besides transferring palettes or palette lines into other maps, it's also a great way to make backups of certain palette configurations.
Layers
Layers in Hexxmap work the same like they do in image editing or painting software. When painting tiles onto the map, they will be stored inside the currently selected layer. Painting a tile at a location where there is already a tile, will replace it. If the tiles get painted on different layers, they will overlay each other instead. This can be useful to paint overlay tiles or icon tiles, like roads or buildings, on top of tiles. The layers are rendered from bottom to top, so the upmost layer will be shown above all other layers.
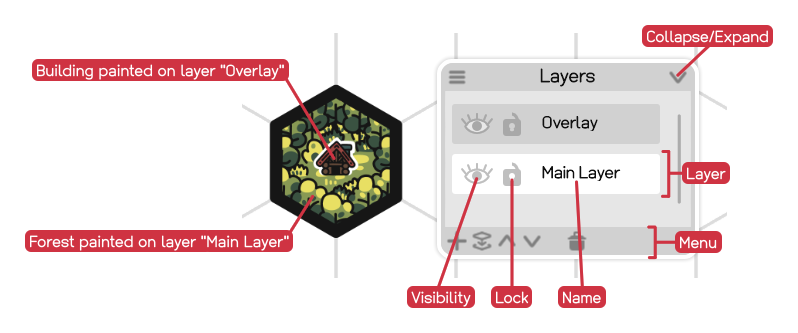
The Layer Dialog can be resized by clicking on the dialog's borders, moved with the Move Button and collapsed respectively expanded by clicking the  Collapse/Expand Button or pressing Ctrl+L.
The currently selected layer has a white background. It is possible to select multiple layers by clicking on them while holding Shift, but when painting, tiles are stored in the first selected layer only, indicated by its white color (while the other selected layers have a light gray background). Another layer can be selected by clicking on it or pressing PageUp or PageDown. Its name can be changed by double clicking on the text or pressing Ctrl+F2.
Each layer's Visibility can be turned off by clicking the ![]() Visibility Button or pressing Ctrl+Q. It is not possible to paint on invisible layers.
Visibility Button or pressing Ctrl+Q. It is not possible to paint on invisible layers.
Furthermore, layers have a Lock which can be toggled by clicking the ![]() Lock Button or pressing Ctrl+W. It is not possible to paint on locked layers either and the feature is meant to avoid accidental changes to the map.
Lock Button or pressing Ctrl+W. It is not possible to paint on locked layers either and the feature is meant to avoid accidental changes to the map.
At the bottom of the Layer Dialog, there's a menu to create, merge, move and delete layers. Click the  Add Layer Button or press Ctrl+Insert to add a layer. Layers can be merged by selecting multiple layers and clicking the
  Merge Layers Button or pressing Ctrl+E. If only one layer is selected, it will be merged with the layer below. If multiple layers are selected, only they will be merged together, from top to bottom. To re-order layers (and therefore the order in which they are drawn onto the map), select a layer and use the
  Move Layer Up Button and Move Layer Down Button or press Ctrl+PageUp respectively Ctrl+PageDown. Alternatively, you can drag and drop layers to their new location. Finally, selected layers can be deleted with the Delete Layer Button or by pressing Ctrl+Delete, although there will always be at least one layer on the map.
Cut, copy and paste via Ctrl+X, Ctrl+C and Ctrl+V only works for layers, if a click was performed in the Layer Dialog and the cursor is still inside. That condition is also true when trying to select or unselect all layers with Ctrl+A and Ctrl+Shift+A.
Fun fact: some tools work across multiple layers, like the Move Tool. This can be used, as an example, to move a tile and its overlay at once.
Undo & Redo
Almost any action in Hexxmap can be undone (and re-done) by pressing Ctrl+Z and Ctrl+Y respectively. By default, the undo history will record up to 100 entries, but this can be changed in the Settings (category "Tools").
File Menu
The File Menu can be found at the right side of the window. Map files are saved in the Maps User Data Folder and have the extension .hexxmap, but as they are text files, they can be opened and edited with a text editor.
➜ Create Map
Click on the ![]() New Map Button in the File Menu or press Ctrl+N to create a new map. The default name of a new map can be configured in the Settings (category "Map Files"). Check the Grid Properties section for the proper map properties when using my tile packs.
New Map Button in the File Menu or press Ctrl+N to create a new map. The default name of a new map can be configured in the Settings (category "Map Files"). Check the Grid Properties section for the proper map properties when using my tile packs.
➜ Open Map
Click on the ![]() Open Map Button in the File Menu or press Ctrl+O to open a map. When starting Hexxmap, it will load the map you were working on the last time. You can change that behavior in the Settings (category "Map Files") so that a new map is created on startup instead.
Open Map Button in the File Menu or press Ctrl+O to open a map. When starting Hexxmap, it will load the map you were working on the last time. You can change that behavior in the Settings (category "Map Files") so that a new map is created on startup instead.
➜ Save Map
Click on the ![]() Save Map Button in the File Menu or press Ctrl+S to save the map you are working on. The button is semi-transparent when no changes were made. If you want to save the map with a new name (while keeping the old one), use the
Save Map Button in the File Menu or press Ctrl+S to save the map you are working on. The button is semi-transparent when no changes were made. If you want to save the map with a new name (while keeping the old one), use the ![]() Save Map As Button or press Ctrl+Shift+S, like you are probably used from other programs.
Save Map As Button or press Ctrl+Shift+S, like you are probably used from other programs.
Hexxmap will ask if you want to save the map if you try to close the program or open another map without saving the changes done in the current map first. This behavior can be changed in the Settings (category "Map Files"), so that maps are automatically saved without asking or not saved at all, when closing a map.
Maps are also auto-saved every 5 minutes. This interval can be also configured and turned off in the Settings (category "Map Files").
➜ Backup Map
Click on the ![]() Backup Map Button in the File Menu or press F5 to save the map and then create a backup. Backups are copies of maps stored in the Backups User Data Folder. Their file name includes a unix timestamp. To restore a backup, rename the file appropriately, while keeping the .hexxmap extension, move it to the Maps-folder and open it within Hexxmap.
Backup Map Button in the File Menu or press F5 to save the map and then create a backup. Backups are copies of maps stored in the Backups User Data Folder. Their file name includes a unix timestamp. To restore a backup, rename the file appropriately, while keeping the .hexxmap extension, move it to the Maps-folder and open it within Hexxmap.
A backup will also and always save the map, too.
Backups will be automatically created every 30 minutes. Hexxmap will also create a backup when opening a map. This can be turned off in the Settings. There's also a feature where a backup gets created on saving a map or when closing a map, but these settings are turned off by default.
➜ Export Map
Click on the ![]() Export Map Button in the File Menu or press Ctrl+Shift+E to open the Map Export Dialog. The dialog can be moved with the Move Button in the top left corner of the dialog.
Export Map Button in the File Menu or press Ctrl+Shift+E to open the Map Export Dialog. The dialog can be moved with the Move Button in the top left corner of the dialog.
There are quite a few options to choose from when exporting a map:
- File Name: the file name to export to, which is usually the map file name, but with the extension ".png". Right next to it is a button which opens a file dialog, so you can choose the file you want to export to (or overwrite, if the file already exists).
- Map Padding: this will add an empty buffer around the exported map.
- Zoom: this will use the original zoom, not the Adapted Zoom. Be aware that the original Isle of Lore 2 tiles are in print quality and therefore high resoluted, but they will look normal-sized in Hexxmap due to the zoom adaptation. When exporting though, a zoom of 100% will export the tiles in their original, huge size. Therefore, a zoom of 50% or smaller is recommended, depending on what you are using the export for.
- Use current zoom instead: when active, it will overwrite the zoom input field with the current zoom level you are displaying the map with.
- Render tiles: if tiles are exported or not. This can be disabled to only export a grid, for example as a template.
- Render back grid: if the background grid is exported or not.
- Render front grid: if the foreground grid is exported or not. This grid is only shown on tiles, not on the background grid though.
- Render current tile selection: if you have any tiles selected on the canvas, this selection will be visible in the export, too.
- Render map labels: if Map Labels are exported or not.
- Render tile coordinates: if Tile Coordinates are shown on top of tiles in the export.
- Render tile coordinates on empty tiles: if Tile Coordinates are shown on top of empty grid cells in the export.
- Render fog of war: if Fog of War is exported or not. The fog of war overlay doesn't have any transparency in the export, as opposed to how it is displayed in Hexxmap.
Maps will be exported to image files (png) and stored in the Exports User Data Folder. If a map is too big to be exported within a 4096x4096px texture, it will create multiple textures you'll have to stitch together yourself (or print separately). In that case, the files have a _x_y in their file name, for example _0_2, which represent the x and y coordinate, with 0/0 at the top left, x going to the right and y going down.
➜ Open User Data Folder
Click on the ![]() User Data Folder Button in the File Menu or press F7 to open the User Data Folder. You can open the Settings-folder directly by pressing Ctrl+F7.
User Data Folder Button in the File Menu or press F7 to open the User Data Folder. You can open the Settings-folder directly by pressing Ctrl+F7.
Main Menu
The Main Menu can be found by moving the cursor close to the left side of the window. There you'll find 4 buttons:
 Map Editor (F9): opens the canvas.
 Documentation (F11): opens the local version of this documentation.
 Shop: opens my Hexxmap Shop with tile packs I've made.
 Settings (F12): open the Settings screen.
At the bottom left corner of the window and main menu, you'll find access to the ![]() Info Screen and a button to
Info Screen and a button to ![]() close Hexxmap.
close Hexxmap.
Color Picker
The Color Picker Dialog appears when clicking on a color button and is used to define a color. The dialog can be moved with the Move Button in the top left corner of the dialog.
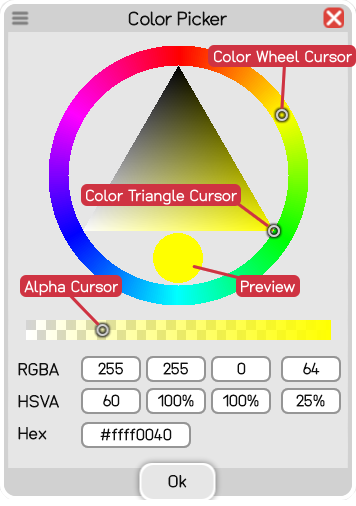
The dialog lets you define a color by moving the Color Wheel Cursor inside the Color Wheel to set the hue, and the Color Triangle Cursor inside the Color Triangle to set the saturation (horizontal) and value (vertical). The circle below the triangle shows you the preview. Depending on which kind of color you are defining, an Alpha Value (opacity) can be set by using the Alpha Cursor inside the Alpha Rectangle, and placing it somewhere between completely transparent (left) and opaque (right).
The resulting color is displayed as both RGBA (red, green, blue, alpha) and HSVA (hue, saturation, value, alpha), as well as in the hex format. You can use these input fields to change the values manually.
Settings
The Settings can be opened by clicking on the ![]() Settings Button in the Main Menu or by pressing F12.
Settings Button in the Main Menu or by pressing F12.
The settings screen lets you configure Hexxmap to your liking. If you change a setting, a small  Restore Button will appear next to it, which allows you to change the setting back to its default.
Shortcuts are listed at the very bottom of the settings screen and can be changed by clicking on the currently set shortcut. A "...press..." will appear, requesting you to set the shortcut. Pressing Escape will stop the process.
The settings file is a text file, so you can edit it manually in a text editor. Press Ctrl+F7 to open the folder containing the settings.txt. Please be careful in regard to making changes directly in the settings file itself, as invalid input can lead to weird results, corrupted maps or program crashes. For most settings, changing them manually requires a restart of Hexxmap. Some obscure settings are not visible in the settings menu within Hexxmap, but only visible and changeable in the settings file.
Shortcuts
The following table lists all shortcuts available in Hexxmap. Most of them can be rebound in the Settings (category "Shortcuts"), with some exceptions like pressing Escape to close a dialog. Important and frequently used shortcuts you should learn by heart are colored red in the table below.
Pop & Sound Effects
Many actions in Hexxmap, including button clicks, will result in certain visual and auditory effects, which can be turned off in the Settings (category "Effects"). There, you will also be able to set the general sound volume.
References
➜ Grid Properties
The following table lists the default Map Properties for my tile packs. Please be aware, that the pointy and flat orientation may have different values.
Isle of Lore 2 refers to Isle of Lore 2: Hex Tiles and Isle of Lore 2: Strategy Figures. Isle of Lore 1 refers to Isle of Lore: Hex Tiles.
| Tile Pack | Orientation | Tile Size | Displacement | Distance | Offset | Grid Line Width |
Grid Node Width |
Coordinates Font Size |
Coordinates Outline Width |
|---|---|---|---|---|---|---|---|---|---|
| Isle of Lore 2 | Pointy | 620, 722 | 180 | 620, 544 | 0, 0 | 14 | 14 | 120 | 30 |
| Isle of Lore 2 | Flat | 722, 625 | 180 | 536, 625 | 0, 0 | 14 | 14 | 120 | 30 |
| Isle of Lore 1 | Flat | 350, 130 | 120 | 230, 130 | 0, -100 | 5 | 5 | 30 | 10 |
Troubleshooting
First and foremost, sorry for the inconvenience! Program crashes and other technical issues are really annoying. If you report bugs and other problems you encounter, I can fix them for you and other users as well, so don't hesitate to reach out.
If the issue could be related to the Settings, closing Hexxmap and deleting the settings.txt inside the Settings User Data Folder will restore the settings to default on the next startup. You might want to make a backup of the file though, in case you want to restore some of your settings later.
If Hexxmap crashes or ends abruptly, it will likely create a crashlog file inside the Logs User Data Folder. Press Ctrl+Shift+F7 to open the Logs-folder and send the files in there to me (info@stevencolling.com) with a description of what happened.
If your map got corrupted and you lost valuable work, try to restore a Backup or send me the file, maybe I can save some of the data. If you want to get into the map file yourself, open it with a text editor and check what could have gone wrong.
My Discord Server is also a good address to discuss and solve problems with other people.
Changelog
Fixed tile coordinate offset (thanks Mobius).
Fixed startup crash caused by loading system fonts (thanks Jonas). Removed dummy file paths from demo map.
First release.
Contact
Feel free to contact me about anything, including bugs, questions and feedback:
- Email: info@stevencolling.com
- Website: stevencolling.com
- Mailing List
- stevencolling on Discord
- Discord Server
Licenses & Terms
➜ Hexxmap Terms & License
Hexxmap License Agreement
Copyright © 2026 Steven Colling. All rights reserved.
20. MARCH 2026
Author: Steven Colling
Contact: info@stevencolling.com
1. Grant of License
Steven Colling grants you a personal, non-transferable, non-sublicensable license to install and use Hexxmap on your devices. You are allowed to modify, patch, or otherwise alter the software for your personal use only.
2. Restrictions
You may NOT:
- Copy, distribute, sell, or share Hexxmap or any modified versions.
- Redistribute modified versions to third parties in any form.
- Reverse engineer or decompile the software beyond what is necessary for personal modifications.
3. Content Ownership
You retain full ownership of all works, content, and creations made using Hexxmap. You may use, distribute, and sell such works commercially without restriction. Modifications to the software are for personal use only and do not grant rights to distribute the modified software.
4. Warranty Disclaimer
Hexxmap is provided “as-is,” without warranty of any kind. Steven Colling is not liable for any damages arising from the use or modification of the software.
5. Termination
This license terminates automatically if you violate any of the restrictions above. Upon termination, you must delete all copies of Hexxmap, including any modified versions.
6. Governing Law
This agreement is governed by the laws of Germany.
➜ Honey Pigeon License
Steven Colling Embedded Font License 1.1
20. MARCH 2026
Font: Honey Pigeon
Author: Steven Colling
Contact: info@stevencolling.com
If you bought a proper license of the "Hexxmap" software, you can use
this font within "Hexxmap" to create maps and export them, for example
to an image format like png. You can then use these maps and their
exports in a commercial context, in an unlimited amount of commercial
and non-commercial projects, including video games, software, print
products and websites.
Do not distribute the font or any modification of it or make
it otherwise available to others.
Do not sell the font or any modification of it.
For the love of god, do not upload it to font websites or distribute
it in font packs.
Attribution is appreciated but not required.
If you want to use "Honey Pigeon" outside of "Hexxmap", for example
within a text processor or image editing software or on your website
to create/display text in the "Honey Pigeon" font, please buy a
proper license of "Honey Pigeon". For more information, visit:
https://stevencolling.com/asset_packs.htm#Honey_Pigeon
➜ Other Licenses
Hexxmap uses the framework .NET, the game framework MonoGame and the font rendering library Typography. The licenses of these libraries can be found in the Licenses-folder in the software's install directory. Hexxmap also uses a library called AxoUtility, which is an own, so far unpublished utility library I use across multiple projects.