
Color Mapper
Introduction
Color Mapper is a tool to assemble image files. I developed it alongside my Isle of Lore 2: Hex Tiles asset pack to allow users to regenerate the elements (like trees) with a different color palette. Although the source files would allow to re-color single layers of a tree within an image editing software like Krita, doing that for hundreds of files is quite cumbersome! Changing the color value or saturation of the final image instead will unfortunately affect all the colors at once. With Color Mapper though, you can define a meta file to declare how a tree is assembled and what colors are used and apply this routine automatically to every tree element. Additionally, the final images can be resized, repositioned and scaled. It is also possible to create so-called compositions, which consist of multiple images, like a group of people in my Isle of Lore 2: Strategy Figures pack.
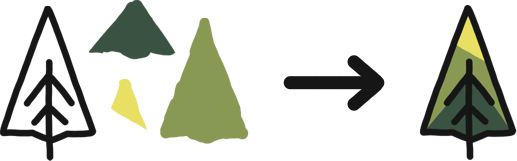
Color Mapper assembling a pine tree from its single parts.
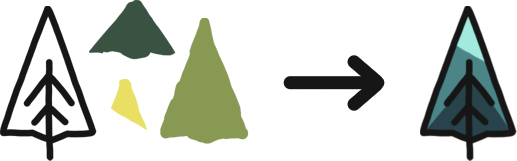
Color Mapper assembling a pine tree, but also switching out the colors of the single parts.
Please keep the license in mind, which is available as a License.txt-file in the folder you downloaded. If you have questions or feedback, you can reach me through the following channels. I especially recommend the mailing list and my Discord server to stay up-to-date respectively to chat about your and my projects!
- E-Mail: info@stevencolling.com
- Mailing List (get news and exclusive discounts!): https://mailinglist.stevencolling.com/game_assets/
- Discord Server (connect with others using my software and assets!): https://stevencolling.com/discord.php
- Discord Profile: https://discordapp.com/users/171308170038214656/
- General Help: https://stevencolling.com/help.htm
- Website: https://stevencolling.com
Configuration
- Unpack the Color Mapper zip file. Among the unzipped files, there should be ColorMapper.exe as well as a config.txt and a zip file called pine_trees.zip.
- Open the configuration file config.txt. Within, you have to set the root to a folder on your computer in which Color Mapper will expect its input folder with all your source files and the output folder where it will put the assembled images.
- Start ColorMapper.exe. Color Mapper will create an input and an output directory within root, if not already there. Close the program after it wrote Color mapping done!.
- Unzip the pine_trees.zip in Color Mapper's directory and move the files to its own folder pine_trees within the input folder. So, in the end, there should be a bunch of files (for example a pine_tree_0.kra among other png and txt files) in root\input\pine_trees. If you bought any of my asset packs supporting Color Mapper, you can use the Sources\input-files of that pack instead, of course.
- If you start ColorMapper.exe again, it should now assemble the exemplary pine trees from the input folder and put them in the output folder, both in a green and a winter variant. Congratulations, Color Mapper is now set up; let's find out how it actually works!
Color Mapper Files
Within an input folder like the exemplary root\input\pine_trees, you'll find so-called Color Mapper Files with file names like green.colormapper.txt or winter.colormapper.txt. The colormapper.txt-part indicates to Color Mapper, that this is a Color Mapper File and that the folder in which it is in contains image files to assemble. The prefix in the file name, like green or winter, is the Palette Name and defines, how the palette is called when the files get assembled.
Within the green.colormapper.txt-file, you will see this:
line -> iol2_dark
light -> iol2_green_light
dark -> iol2_green_dark
medium -> iol2_green_medium
These are mappings from Layer Names to Color Names. Have a look at the png files in root\input\pine_trees:
pine_tree_0_dark.png
pine_tree_0_light.png
pine_tree_0_line.png
pine_tree_0_medium.png
...
You see, that one of the pine trees (pine tree 0) consists of 4 layers: dark, light, line and medium. The same is true for the other pine trees. These are the Layer Names.
!
Input image files need to follow the (name)_(id)_(layer).png naming convention. While (name) and (layer) can include additional underscores, (id) has to be a numerical value. Otherwise, Color Mapper won't parse these files correctly!
The Color Names are defined in the Color Mapper configuration file config.txt:
...
color: iol2_white -> #ffffff
color: iol2_dark -> #161616
color: iol2_green_light -> #e8df63
color: iol2_green_medium -> #889954
color: iol2_green_dark -> #3a5241
...
Going back to the Color Mapper File green.colormapper.txt...
line -> iol2_dark
light -> iol2_green_light
dark -> iol2_green_dark
medium -> iol2_green_medium
...means, that the layer line will be mapped to the color iol2_dark (#161616), the layer light to the color iol2_green_light (#e8df63) and so on.
The order of these mappings defines the order in which the image files are assembled, from bottom to top like in an image editing software: first the medium-layer is rendered in the iol2_green_medium-color, then the dark-layer in the iol2_green_dark-color on top and so on.
If you have a look at the Color Mapper File winter.colormapper.txt, you'll see how the layers are mapped to different colors:
line -> iol2_dark
light -> iol2_snow_light
dark -> iol2_snow_dark
medium -> iol2_snow_medium
Executing the Color Mapper will create folders for every palette, in case of the pine trees, there will be a pine_trees.green and a pine_trees.winter folder in the output folder.
Summary: Color Mapper will look through all the folders in the input folder and gather the Color Mapper Files, inferring the Palette Names from the file names as well as the "Layer Name to Color Name"-mappings from within the file. Then it will color and assemble the image files within these folders based on these mappings and output the generated images to their own folders based on the Palette Name.
Creating a Color Mapper File
- Create a new text file palette.colormapper.txt within the folder containing the image files to assemble, with palette as your palette name (like green or winter from the pine tree example above). This is your new Color Mapper File.
- Within the created Color Mapper File, add mapping statements layer -> color which map Layer Names to Color Names. Be sure to put each mapping statement in its own line. Check the suffixes of the image files to indentify the Layer Names and check Color Mapper's configuration file config.txt for the Color Names. Here is the exemplary mapping again as reference:
- Run Color Mapper and let it create a new folder in the output directory.
line -> iol2_dark
light -> iol2_green_light
dark -> iol2_green_dark
medium -> iol2_green_medium
!
When running Color Mapper, output folders do not get deleted or cleared beforehand. That means, old files stay there or get overwritten.
Creating a Composite File
Composites are constellations of multiple images and were introduced with the release of the Strategy Figures pack update. In this pack, there are groups of figures, like a group of people or a group of orcs. Instead of having them as unique files with all the layer files duplicated for every entity in that group, Color Mapper can instead read in so-called Composite Files which define how these images are composed of other images. It is similar to Tile Builder in nature, but simpler and more abstract. The advantage of Composites is, that changes to the individual figures, like a change in the color palette, will propagate to all the group figures automatically.
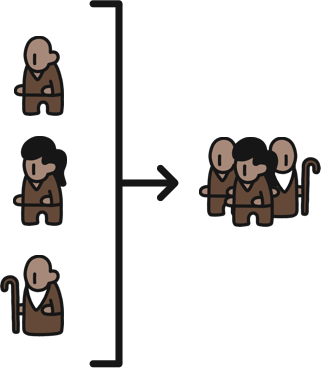
Color Mapper assembling the figure figure_people_64 from the figures figure_villager_0, figure_villager_female_100 and figure_elder_1 through the composite file figure_people_64.composite.colormapper.txt in the Strategy Figures pack.
For every composite, there needs to be a Composite File in one of the input folders. If you own the Strategy Figures pack, you will find such composite files in input\figures, for example figure_people_64.composite.colormapper.txt. The file ending composite.colormapper.txt will let Color Mapper recognize this file as a Composite File. Its file content declares, how that specific Composite is put together:
width:800 height:500
id:"figures\figure_villager_female_100" x:0 y:0 flipped:false outline-cutoff:350
id:"figures\figure_villager_0" x:-100 y:-40 flipped:false
id:"figures\figure_elder_1" x:100 y:-40 flipped:true
The first line defines the output image's bounds, in this case, the people-figure will be an image with a width of 800 and a height of 500, like all the other figures. Then, every following line will render a figure onto the composite image, from bottom to top, meaning that the elder-figure gets rendered first, then the villager-figure and finally the villager_female-figure. The lines refer to an id, which is the name of the input-directory, followed by a slash \ and the name of the figure. The x and y values will position the figures on the final composite image, while flipped will horizontally mirror the image.
In the example above, this will result in a front and center female villager with a male villager slightly placed upwards to make it look like it is standing behind the female villager, while the elder is additionally flipped so he looks to the right.
The outline-cutoff will be explained in the section Outline Rendering, as it is a bit of an advanced topic.
Instead of referencing othere elements by their id like in the example above, they also can be referenced by file, too. Check out the file status_icon_afoot0_1000.composite.colormapper.txt from the Isle of Lore 2: Status Icons pack:
width:768 height:768
file:"afoot_0.png" x:0 y:0 flipped:false
id:"status_icons\status_icon_afoot_88" x:0 y:0 flipped:false
One of its entries is not referenced by an id, but by a file. In the example, Color Mapper will look for a file afoot_0.png within the same folder. Use this, if you want to add layers to a composition which are not elements built with Color Mapper, but just plain image files.
Meta Files
Files within input folders called meta.txt will automatically copied over to a generated output folder. These files can include additional meta information which other programs of mine can use, for example a bottom-offset, which is the bottom padding of the actual image within the image file. For Color Mapper itself, their content is not relevant.
Build-Only
Sometimes you want to reassemble only specific input folders or Color Mapper Files. Within Color Mapper's configuration file config.txt, you can specify the path to an input folder or the path to a Color Mapper File. These paths are relative to the input folder. The following line within the config.txt will perform Color Mapper only on the Color Mapper Files within the pine_trees folder:
build-only: pine_trees
In contrast, the following line will only build the Color Mapper File pine_trees\green.colormapper.txt:
build-only: pine_trees\green.colormapper.txt
You can specify multiple build-only entries, separated by commas.
build-only: pine_trees\green.colormapper.txt, pine_trees\winter.colormapper.txt
Commands
The following commands can be used in a Color Mapper File to adjust how Color Mapper renders the files, including scaling them or moving them by an offset. You find an in-depth example further down below. For handling outlines, please refer to the Outline Rendering section.
Absolute Layers
Layer to Color Mappings within a Color Mapper File can be marked with an * to turn them into absolute layers. Then, Color Mapper won't resolve the layer name to a name specific to the current image it is rendering, but uses the layer name as-is. Take the following entry as an example:
line -> iol2_dark
If Color Mapper renders this layer for pine_tree_0, it will look for a png-file called pine_tree_0_line.png and renders that image in the color iol2_dark, as explained in the introductory section Color Mapper Files. If the layer entry in the Color Mapper File is instead marked like the following example shows, Color Mapper won't look for pine_tree_0_line.png, but for line.png instead, independently which pine tree it is rendering. This allows to use a single reoccuring layer for all images.
*line -> iol2_dark
My Isle of Lore 2: Terrain Icons pack uses this functionality to render the borders of the icons, like the following example from the Color Mapper File standard_circle.colormapper.txt shows. Color Mapper will use the file border_circle.png for all the icons so you can avoid having the same border png file duplicated for every single icon.
mask: mask_circle
*border_circle -> iol2_dark
line -> iol2_dark
dark -> iol2_dark
orange -> iol2_orange
yellow -> iol2_yellow
...
Source
A Color Mapper File with the following statement will gather the image files from a different folder, relative to the Color Mapper File's location:
source: ..\somewhere_else
This will execute the color mappings on the image files found in the folder somewhere_else above.
Size
A Color Mapper File with the following statement will resize the output image's boundaries. The image itself is not scaled. The first argument is the width and the second argument the height, in pixels.
size: 500 500

The size-command with the arguments 500 and 500 will change the image boundaries (not the image itself!) to 500x500 pixels.
Offset
A Color Mapper File with the offset-command will offset the image within a resized image (check the size-command). The offset is applied relatively to the image's top-left corner. The first argument is the horizontal offset (x), the second argument is the vertical offset (y). Here is an example:
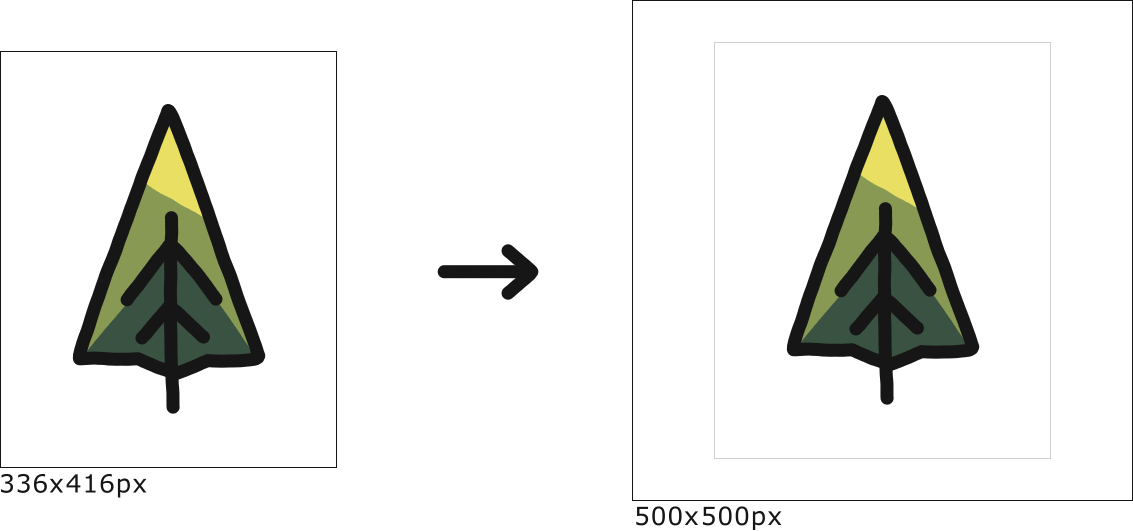
size: 500 500
offset: 50 50
This will resize the image's boundaries to 500x500 pixels and place the image with an offset of 50x50 pixels.
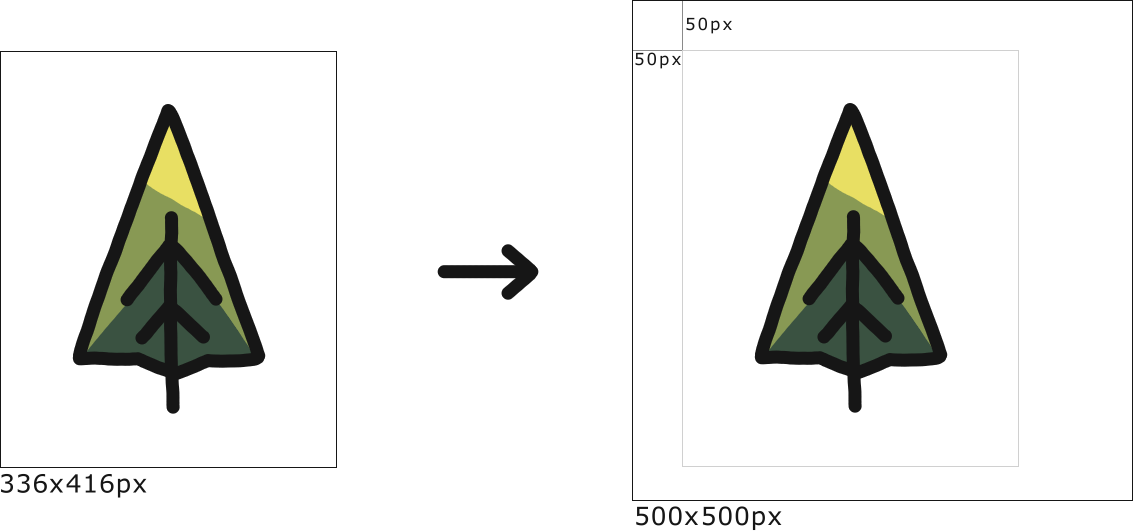
The size-command resized the image to 500x500 pixels, the offset-command moved it by 50x50 pixels.
Centered
A Color Mapper File with the centered-command will place the image centered when an offset is applied in a resized image. Check the following example to place an image centered within resized boundaries.
size: 500 500
offset: 250 250
centered: true
The size-command resized the image to 500x500 pixels, the offset-command moved it by 250x250 pixels and the centered-command made sure, the image is placed centered on that spot at 250x250.
Scale
A Color Mapper File with the scale-command will scale the image, while preserving the effects of the size-, offset- and centered-commands. The first argument will scale the image horizontally (x), the second argument vertically (y). Both arguments are floating point numbers between 0.0 (0%) and 1.0 (100%). Look at the following example to scale an image to 25% of its original size:
scale: 0.25 0.25
Outline
A Color Mapper File with the outline-command allows you to declare which of the layers are outline layers. Please refer to the Outline Rendering section on how outlines are used in Color Mapper. Here is an example on how it is used in the Strategy Figures pack:
outline: frame, frame_full
Outline Cutoff
A Color Mapper File with the outline-cutoff-command declares, if the images produced with this Color Mapper File will cut off part of the outline at a specific point defined in the Composite Files. Please refer to the Outline Rendering section for a proper explanation.
outline-cutoff: true
Masks
This feature allows to make parts of the rendered image transparent based on an image file called a mask. Take the following example from my Isle of Lore 2: Terrain Icons pack. Color Mapper first renders an icon with border and then applies a mask to make everything outside the circle transparent, while everything white within the mask stays there.
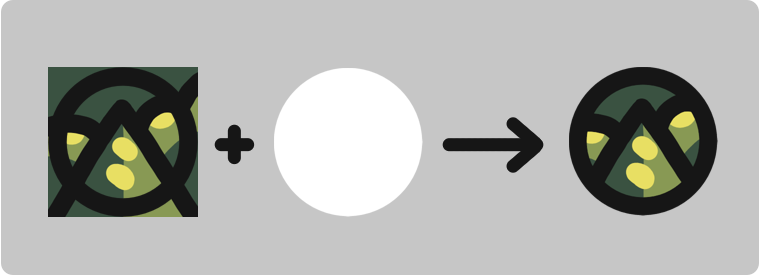
Using a mask to make parts of an image transparent, in this case everything outside a circle.
To apply a mask to the images produced with Color Mapper, add the following command to the Color Mapper File, with mask_circle referencing a file mask_circle.png which has to be in the same folder as the Color Mapper File.
mask: mask_circle
The mask-command can be called at any position within the Color Mapper File, therefore allowing to render further images after having applied the mask. Take standard_circle_thin_named.colormapper.txt from the Terrain Icons pack as an example:
size: 930 922
centered: true
offset: 465 461
name -> iol2_dark
*name_line -> iol2_dark
*name_shadow -> iol2_cloud_light
*name_fill -> iol2_white
mask: mask_circle_inner_930x922
*border_circle_inner -> iol2_dark
line -> iol2_dark
dark -> iol2_dark
orange -> iol2_orange
yellow -> iol2_yellow
red -> iol2_red
...
The Layer to Color mappings are as usual executed from bottom to top, with a mask being applied midway through, so that only the image below is affected, while the remaining layers on top (name_fill, name_shadow etc.) are rendered afterwards without being affected by the mask.
!
Masks are required to have the same image bounds as the image they are applied on!
Commands Example
The Isle of Lore 2: Hex Tiles pack uses these commands to generate tile overlays for the location icons. Have a look at one of the location icons below. It has the image boundaries of 800x500 pixels.

A location icon from the Isle of Lore 2: Hex Tiles pack.
If you want to use it in a software to assemble hex tile maps, applying this location icon directly would lead to weird results like shown below, if the software doesn't allow to apply custom offsets.
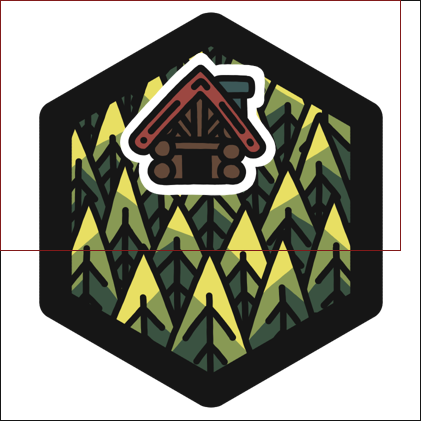
Placing a location icon on top of a tile without any adjustments.
The Isle of Lore 2: Hex Tiles pack generates additional location overlays which have the size of a tile, therefore leading to a perfect overlap. Have a look at input\tiles\overlay_locations\standard_full.colormapper.txt from the asset pack.
source: ..\locations
size: 840 840
offset: 420 360
centered: true
scale: 0.75 0.75
...
This Color Mapper File will grab the location images from the locations folder, resize them to 840x840 pixels (the size of a tile), offsets them centered to the middle of the image, slightly moved up, and scales them down to 75% of their original size. These overlay locations can be found at output\tiles\overlay_locations.standard_full.
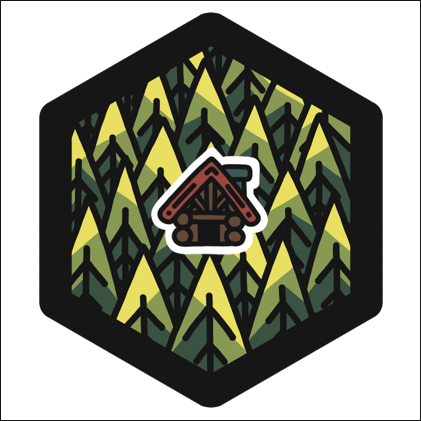
A location icon after the explained procedure, if it were placed on a tile.
Outline Rendering
While adding the composite functionality to Color Mapper for my Strategy Figures pack, I encountered the following problem when rendering groups of figures which have a white outline around them:
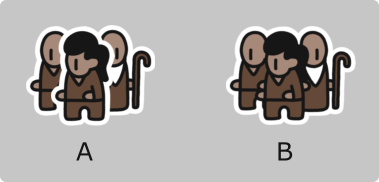
Rendering a composite where the figures have outlines (A) and how a composite with an outline should look like instead (B).
Color Mapper has to know which layers are part of the outline and which are not, render the outline layers first and then all the non-outline layers. As a result, Color Mapper Files can use the outline-command to specify Outline Layers. Have a look at the Color Mapper File figures\standard_full.colormapper.txt from the Strategy Figures pack:
outline: frame, frame_full
head_line -> iol2_dark
head_dark -> iol2_dark
...
The first line of that file defines the outline layers by name with the help of the outline-command, here frame and frame_full. So when Color Mapper renders composites while this Color Mapper File is active, it will render the layers frame and frame_full of all the figures in the composite first, and then the remaining layers, leading to the desired result shown in the illustration above.
Now this issue gets more complicated with semi-outlines, which will stop at the bottom of the figure and leave the bottom side exposed. Even with the outline-command shown above, this will lead to weird results as the outlines of figures will bleed through, like shown in the following illustration.
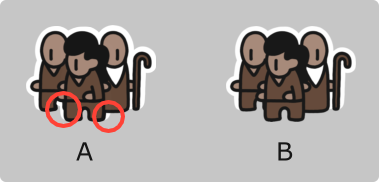
Rendering a composite where the figures have semi-outlines with the outline layers properly identified in the Color Mapper File (A) and how a composite with a semi-outline should look like instead (B).
To resolve this issue, Color Mapper Files can activate a so-called Outline Cutoff Mode with the outline-cutoff-command. If active, Composite Files can specify a outline-cutoff, which is a y-coordinate from which the outline is cut off or not rendered anymore. Have a look at the Color Mapper File figures\standard_semi.colormapper.txt from the Strategy Figures pack:
outline: frame, frame_full
outline-cutoff: true
head_line -> iol2_dark
head_dark -> iol2_dark
...
It not only specifies the outline layers, but also activates the Outline Cutoff Mode. Now have a look at the Composite File figures\figure_people_64.composite.colormapper.txt:
width:800 height:500
id:"figures\figure_villager_female_100" x:0 y:0 flipped:false outline-cutoff:350
id:"figures\figure_villager_0" x:-100 y:-40 flipped:false
id:"figures\figure_elder_1" x:100 y:-40 flipped:true
The Composite File declares an outline-cutoff at 350, which means, that the outline won't get rendered below the y-coordinate 350, like shown in the following illustration.
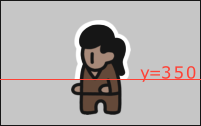
The Color Mapper File activated the Outline Cutoff Mode and the Composite File declared a outline-cutoff at 350, resulting a cutoff of the outline at y=350.
As the Composite File only specified a cutoff for the female villager figure, only that figure's outline will be cut, while the outlines for the elder figure and the male villager figure will be kept intact:

A properly rendered composite figure with a semi-outline.
Troubleshooting
Error: The required configuration file at '...' was not found!
Make sure that the Color Mapper Configuration File config.txt and the ColorMapper.exe are within the same folder.
Error: Could not find root directory at '...'!
Open the config.txt and make sure that the directory specified as root actually exists and the statement is written correctly as follows:
root: path/where/input/and/output/directories/are
Color Mapper doesn't gather Color Mapper Files!
- Make sure the Color Mapper Configuration File config.txt sets the root directory correctly and the Color Mapper Files are in a sub-directory of root\input.
- Make sure the Color Mapper File follows the naming convention palette.colormapper.txt, with palette as the name of the palette.
- Make sure that the Color Mapper Configuration File config.txt doesn't specify a specific built-only which doesn't exist. If applicable, reset it to build-only: in the config.txt.
Color Mapper doesn't compile any File Groups!
A File Group is a set of image files spanning all the images representing the different layers which will later be assembled to a final image. In the example delivered with Color Mapper, the files pine_tree_0_dark.png, pine_tree_0_light.png, pine_tree_0_medium.png and pine_tree_0_line.png belong to one File Group representing pine tree 0 in relation to a Color Mapper File. If Color Mapper doesn't find any File Groups, make sure the files are of the type ".png" and follow the naming convention (name)_(id)_(layer).png. Especially the id is absolutely necessary!
Color Mapper doesn't render any images at all!
This is the case if Color Mapper jumps from Building image files and saving... to Color mapping done! without rendering any images (no Rendering image file (1/x) ... messages). If so, Color Mapper didn't gather any File Groups. See above.
Error: The image group with index ... in directory '...' has invalid bounds!
That means Color Mapper tried to render an image with a width or height of 0 pixel.
- Make sure none of the image files in the input folders have a width or height of 0 pixels.
- Make sure a size-command in a Color Mapper File doesn't set the width or height to 0 pixels or below.
- Make sure a scale-command in a Color Mapper File doesn't set the width or height to 0 pixels or below.
Error: Color Mapper files require a palette name and have to be in the format 'palette.colormapper.txt', for example 'green.colormapper.txt' to create a color mapping file for the palette 'green'.
Make sure the Color Mapper File follows the naming convention palette.colormapper.txt, with palette as the name of the palette.
Error: Could not map color tag '...' to any color. This happened in color mapping file '...'!
This means that one of your Color Mapper Files maps a Layer to a Color which doesn't appear in the Color Mapper Configuration File config.txt. Make sure the color's name isn't a typo in the Color Mapper File and if not, make sure it appears in the config.txt.
Error: Could not find source directory '...'!
Make sure the path you specified with a source-command is relative to the Color Mapper File in which the command was specified and that the path exists.
One or more layers aren't rendered correctly, while others are!
Make sure that the Layer name within a mapping in the Color Mapper File matches the layer name in the corresponding image file. That means, for example, that if a Color Mapper File includes the mapping medium -> some_color, there should be a file like pine_tree_0_medium.png.
Although Color Mapper says it renders images, it actually doesn't render or create any image files!
Remove the files from your output folder and run Color Mapper again to verify that any image files are created in the output folder. If not, check if Color Mapper successfully compiled any File Groups, which should be one of the messages output in the console window. If that's not the case too, refer this or this solution. If Color Mapper generates empty or black images, make sure that the Color Mapper File doesn't have any commands reducing the size or scale of the image to something incredibly small or the offset is placing the image outside of the image bounds.
Error: The mask has to have the same bounds as the image!
Make sure that the Color Mapper File references a mask which has the same image bounds as the image it is applied on. As an example, if the image will be 300x400 pixels in size, the mask has to be 300x400 in size, too!
Error: Could not find file '...' while rendering composite '...'!
Make sure the file referenced directly in the given composite file is a png-file, actually exists in the folder where the composite file is located and is referenced with its extension '.png'.
I have a problem I can't solve or I solved it and it should be mentioned here!
Please write me about it.
Changelog
1.6 19. Apr 2026 Updated the project to .NET 10.
1.5 17. Apr 2024 Added new Isle of Lore 2: UI Pack colors (iol2_ui_) to the config.
1.4 21. Nov 2023 Added the colors iol2_wood and iol2_wood_dark to the config.
1.3 14. Sep 2023 Added file references in Composite Files.
1.2 24. Aug 2023 Added masking and absolute layers. Fixed anti-aliasing bug.
1.1 05. Aug 2023 Faster rendering. Added composites and a command to render outlines only partially. Restructured documentation a bit.
1.0 21. Jun 2023 Release.